From time to time, we get enquiries asking whether the Amulet Voice Remote will work on an Apple Macintosh.
We designed the Amulet for use with a PC — primarily for Windows Media Center — and nobody in the company uses a Mac, so this wasn’t a use we had forseen. Since the Amulet dongle appears as a standard USB audio input device, however, I thought there was a good chance the Mac might recognize it.
So, with some assistance from our friends at Jason Clarke Photography, who provided the Mac hardware to play with, I decided to give it a try.
In fact, using the Amulet Voice Remote on the Macintosh turned out to be much more straightforward than I expected. I simply connected the dongle, enabled Speech Recognition under Apple System Preferences, selected Amulet Devices Voice Remote as the audio input device, and I was ready to go — no special software or drivers needed.
There are a few settings you can tweak to improve the experience, so here’s a quick step by step guide.
Using the Amulet Voice Remote with your Macintosh
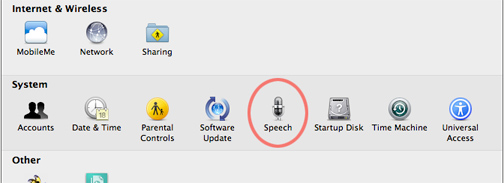
Connect your Amulet USB dongle to any free USB port on the Macintosh. Now, open System Preferences and find the Speech option:
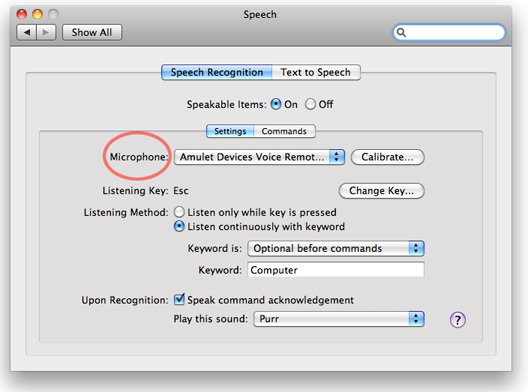
Now, open the Speech dialog, and choose Amulet Devices Voice Remote as the input device:
You should also select Listen continuously with keyword rather than Listen only while key is pressed, otherwise you will need to hold down the ESC key whenever you are talking into your Amulet.
You may also like to turn on Speak command acknowledgement and choose an appropriate sound to play for successful speech recognition, at the bottom of the dialog.
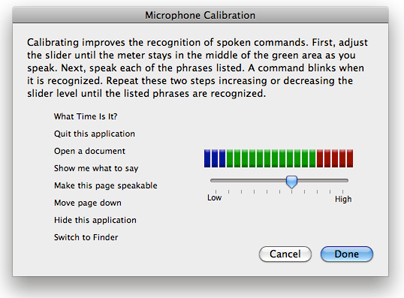
Next, you should calibrate the microphone input level. Click on the Calibrate… button beside the microphone name:
The default input level is set quite high which can result in poor quality recognition. Adjust the slider to just beyond the middle point for optimum recognition. Lift your Amulet Voice Remote and talk into it now to observe the microphone level changing, to ensure you have selected an appropriate level.
You can also try speaking the example phrases listed on the left; they will light up when recognized. When you’re finished, click on Done to close the dialog.
(You may also wish to visit the Text to Speech dialog where you can choose the speaking voice used by the Mac to respond to your instructions.)
After you’ve finished this setup, the Mac will be ready and waiting for your commands. A small microphone window in the upper right corner of the screen shows that it is listening. When you raise the Amulet remote to turn on the microphone and start talking, you can see animation on the microphone to show it is receiving okay.
It’s as easy as that. Give it a try!
More Macintosh Applications
The Amulet should work with any OS X application that supports audio input. If you find a particularly good or unusual use for an Amulet + Mac, please let us know and we’d be happy to blog about it.
Even better, make a YouTube video of you controlling your Mac with an Amulet, and you could win some free Amulet goodies.


